使用 VuePress 搭建博客
![]() VuePress 是一个以 Markdown 为中心的静态网站生成器。你可以使用 Markdown 来书写内容(如文档、博客等),然后 VuePress 会帮助你生成一个静态网站来展示它们。
VuePress 是一个以 Markdown 为中心的静态网站生成器。你可以使用 Markdown 来书写内容(如文档、博客等),然后 VuePress 会帮助你生成一个静态网站来展示它们。
VuePress 官网文档已经写的非常好了。我写这篇文档的目的只是记录自己用 VuePress 1.x 搭建一个博客的全过程。如果你阅读这篇文档,它将教你如何简单直接一步一步的搭建一个博客。请阅读 VuePress 官网文档 v1.x, v2.x。
为什么选择 VuePress
经过调研,简单了解了一下几个博客:
- GitBook: 如今的 GitBook 更加偏向于商业化,而开源版已经几年没维护了。
- Nuxt: 是为构建应用程序而生的,而 VuePress 则专注于以内容为中心的静态网站上。
- Docsify: 完全的运行时驱动,因此对 SEO 不够友好。
vuepress 特性
- 内置的 Markdown 拓展
- 在 Markdown 中 使用 Vue
- Vue驱动的自定义主题系统
- 自动生成Service Worker(支持PWA)
- 强大的 Plugin API
- 基于Git的”最后更新时间
项目搭建
前提条件: VuePress 需要 Node.js >= 8.6
创建并进入一个新目录
1
mkdir MyBlog && cd MyBlog
使用你喜欢的包管理器进行初始化
1
yarn init # npm init
初始化完成后会创建一个
package.json文件1 2 3 4 5 6
{ "name":"blog", "version": "1.0.0", "main": "index.js", "license": "MIT" }
在
package.json中添加一些 scripts,这些命令将用于启动服务器1 2 3 4
"scripts": { "docs:dev": "vuepress dev docs", "docs:build": "vuepress build docs" }
- 启动服务:
yarn docs:dev - 编译打包:
yarn docs:build
将 VuePress 安装为本地依赖
1
yarn add -D vuepress # npm install -D vuepress
- 不再推荐全局安装 VuePress
- 如果你的现有项目依赖了 webpack 3.x,推荐使用 Yarn 而不是 npm 来安装 VuePress。因为在这种情形下,npm 会生成错误的依赖树
创建你的第一篇文档
1
mkdir docs && echo '# Hello VuePress' > docs/README.md
- docs 目录用于存放我们写的
.md文档和.vuepress相关配置
- docs 目录用于存放我们写的
在本地启动服务器
1
yarn docs:dev # npm run docs:dev
- VuePress 会在 http://localhost:8080 启动一个热重载的开发服务器。
基本配置
配置文件
为了让我们的网站更加丰富多彩,需要做一些配置,让我们创建一个 .vuepress 目录和 config.js 文件。
1
2
cd docs
mkdir .vuepress && cd .vuepress && touch config.js
这时你的项目结构可能是这样:
1
2
3
4
5
6
.
├─ docs
│  ├─ README.md
│  └─ .vuepress
│     └─ config.js
└─ package.json
config.js是一个 VuePress 网站必要的配置文件。它最基础的配置内容如下:1 2 3 4
module.exports = { title: '遥望的博客', description: '专注与iOS开发的一些技术分享' }
对于上述的配置,如果你运行起服务:
yarn docs:dev。应该看到以下页面:
默认主题配置
首页
默认的主题提供了一个首页的布局。想要使用它,需要在你的根级 README.md 写一些内容。以下是一个例子:
1
2
3
4
5
6
7
8
9
10
11
12
13
14
15
16
---
home: true
heroImage: /assets/cover.jpg
heroText: 标题
tagline: 副标题
actionText: 快速上手 →
actionLink: /ios/
features:
- title: 简洁至上
  details: 以 Markdown 为中心的项目结构,以最少的配置帮助你专注于写作。
- title: Vue驱动
  details: 享受 Vue + webpack 的开发体验,在 Markdown 中使用 Vue 组件,同时可以使用 Vue 来开发自定义主题。
- title: 高性能
  details: VuePress 为每个页面预渲染生成静态的 HTML,同时在页面被加载的时候,将作为 SPA 运行。
footer: MIT Licensed | Copyright © 2020-present Yao wang
---
- 你可以将相应的内容设置为
null来禁用标题和副标题。
对于上述的配置,如果你运行起服务: yarn docs:dev 。应该看到以下页面: 
导航栏配置
导航栏 Logo
将Logo图标放置在 .vuepress/public/assets 目录,并在 config.js 中添加:
1
2
3
4
5
6
// .vuepress/config.js
module.exports = {
  themeConfig: {
    logo: '/assets/logo.png',
  }
}
导航栏链接
1
2
3
4
5
6
7
8
9
10
11
// .vuepress/config.js
module.exports = {
  themeConfig: {
    nav: [
      { text: '首页', link: '/' },
      { text: 'iOS', link: '/ios/' },
      { text: '前端', link: 'frontend' },
      { text: '关于', link: 'about' },
    ]
  }
}
如果想要一个 下拉列表 ,可提供了一个 items 数组而不是一个单一的 link 如下:
1
2
3
4
5
6
7
8
9
10
11
12
13
14
15
16
// .vuepress/config.js
module.exports = {
  themeConfig: {
    nav: [
      { text: '首页', link: '/' },
      { text: 'iOS', link: '/ios/' },
      { text: '前端', link: '/frontend/' },
      { text: '关于', link: '/about/' },
      { text: '语言', items: [
          { text: "中文", link:"/language/chinese/"},
          { text: "英语", link:"/language/english/"}
        ]
      }
    ]
  }
}
此外,你还可以通过嵌套的 items 来在 下拉列表 中设置分组:
1
2
3
4
5
6
7
8
9
10
11
12
13
14
// .vuepress/config.js
module.exports = {
  themeConfig: {
    nav: [
      {
        text: '语言',
        items: [
          { text: 'Group1', items: [/*  */] },
          { text: 'Group2', items: [/*  */] }
        ]
      }
    ]
  }
}
对于上述的配置,如果你运行起服务: yarn docs:dev 。应该看到以下页面: 
禁用导航栏
你可以使用 themeConfig.navbar 来禁用所有页面的导航栏:
1
2
3
4
5
6
// .vuepress/config.js
module.exports = {
  themeConfig: {
    navbar: false
  }
}
你也可以在 README.md 里添加以下代码 来禁用某个指定页面的导航栏:
1
2
3
---
navbar: false
---
侧边栏配置
侧边栏分组
你可以在 config.js 里使用 对象 来将侧边栏划分成多个组:
1
2
3
4
5
6
7
8
9
10
11
12
13
14
15
16
17
18
19
20
21
// .vuepress/config.js
module.exports = {
  themeConfig: {
    sidebar: [
      {
        title: 'Group 1',   // 必要的
        path: '/foo/',      // 可选的, 标题的跳转链接,应为绝对路径且必须存在
        collapsable: false, // 可选的, 默认值是 true,
        sidebarDepth: 1,    // 可选的, 默认值是 1
        children: [
          '/'
        ]
      },
      {
        title: 'Group 2',
        children: [ /* ... */ ],
        initialOpenGroupIndex: -1 // 可选的, 默认值是 0
      }
    ]
  }
}
- 侧边栏的每个子组默认是可折叠的,你可以设置
collapsable: false来让一个组永远都是展开状态。 - 一个侧边栏的子组配置同时支持
sidebarDepth字段用于重写默认显示的侧边栏深度(1)。
多个侧边栏
如果你想为不同的页面组来显示不同的侧边栏,首先,将你的页面文件组织成下述的目录结构:
1
2
3
4
5
6
7
8
9
10
11
.
├─ README.md
├─ about.md
├─ foo/
│  ├─ README.md
│  ├─ one.md
│  └─ two.md
└─ bar/
   ├─ README.md
   ├─ three.md
   └─ four.md
接着,遵循以下的侧边栏配置:
1
2
3
4
5
6
7
8
9
10
11
12
13
14
15
16
17
18
19
20
21
22
23
24
// .vuepress/config.js
module.exports = {
  themeConfig: {
    sidebar: {
      '/foo/': [
        '',     /* /foo/ */
        'one',  /* /foo/one.html */
        'two'   /* /foo/two.html */
      ],

      '/bar/': [
        '',      /* /bar/ */
        'three', /* /bar/three.html */
        'four'   /* /bar/four.html */
      ],

      // fallback
      '/': [
        '',        /* / */
        'about'    /* /about.html */
      ]
    }
  }
}
确保 fallback 侧边栏被最后定义。VuePress 会按顺序遍历侧边栏配置来寻找匹配的配置。
自动生成侧栏
你可以在 config.js 中配置 themeConfig.sidebar 来在所有页面中启用它:
1
2
3
4
5
6
// .vuepress/config.js
module.exports = {
  themeConfig: {
    sidebar: 'auto'
  }
}
对于上述的配置,如果你运行起服务: yarn docs:dev 。应该看到以下页面:

搜索框配置
内置搜索框
1
2
3
4
5
6
7
// .vuepress/config.js
module.exports = {
  themeConfig: {
    search: false, // 禁用默认的搜索框
    searchMaxSuggestions: 10 // 调整默认搜索框显示的搜索结果数量
  }
}
最后更新时间
你可以通过 themeConfig.lastUpdated 选项来获取每个文件最后一次 git 提交的 UNIX 时间戳(ms),同时它将以合适的日期格式显示在每一页的底部:
1
2
3
4
5
6
// .vuepress/config.js
module.exports = {
  themeConfig: {
    lastUpdated: '上次更新', // string | boolean
  }
}
由于
lastUpdated是基于git的, 所以你只能在一个基于git的项目中启用它。此外,由于使用的时间戳来自 git commit,因此它将仅在给定页的第一次提交之后显示,并且仅在该页面后续提交更改时更新。
上 / 下一篇链接
上一篇和下一篇文章的链接将会自动地根据当前页面的侧边栏的顺序来获取。
1
2
3
4
5
6
7
// .vuepress/config.js
module.exports = {
  themeConfig: {
    nextLinks: false, // 默认值是 true 。设置为 false 来全局禁用所有页面的 下一篇 链接
    prevLinks: false  // 默认值是 true 。设置为 false 来全局禁用所有页面的 上一篇 链接
  }
}
Git 仓库和编辑链接
当你提供了 themeConfig.repo 选项,将会自动在每个页面的导航栏生成生成一个 GitHub 链接,以及在页面的底部生成一个 "Edit this page" 链接。
1
2
3
4
5
6
7
8
9
10
11
12
13
14
15
// .vuepress/config.js
module.exports = {
  themeConfig: {
    repo: 'liam-i/blog', // 假定是 GitHub. 同时也可以是一个完整的 GitLab URL
    repoLabel: 'GitHub', // 自定义仓库链接文字。默认从 `themeConfig.repo` 中自动推断

    // 以下为可选的编辑链接选项

    docsRepo: 'liam-i/blog', // 假如你的文档仓库和项目本身不在一个仓库:
    docsDir: 'docs', // 假如文档不是放在仓库的根目录下:
    docsBranch: 'master', // 假如文档放在一个特定的分支下:
    editLinks: true, // 默认是 false, 设置为 true 来启用
    editLinkText: '帮助我们改善此页面!' // 默认为 "Edit this page"
  }
}
评论 Vssue 配置
为什么选择 Vssue
Vssue 的灵感来自于 Gitment 和 Gitalk,但是和它们有些区别:
- Vssue 支持 Github, Gitlab, Bitbucket, Gitee 和 Gitea,并且很容易扩展到其它平台。Gitment 和 Gitalk 仅支持 Github。
- Vssue 可以发表、编辑、删除评论。Gitment 和 Gitalk 仅能发表评论。
- Vssue 是基于 Vue.js 开发的,可以集成到 Vue 项目中,并且提供了一个 VuePress 插件。Gitment 基于原生JS,而 Gitalk 基于 Preact。
创建 GitHub OAuth App
- 前往 Settings - Developer Settings - OAuth Apps

将
Homepage URL和Authorization callback URL设置为你的网站 URL。示例如下图: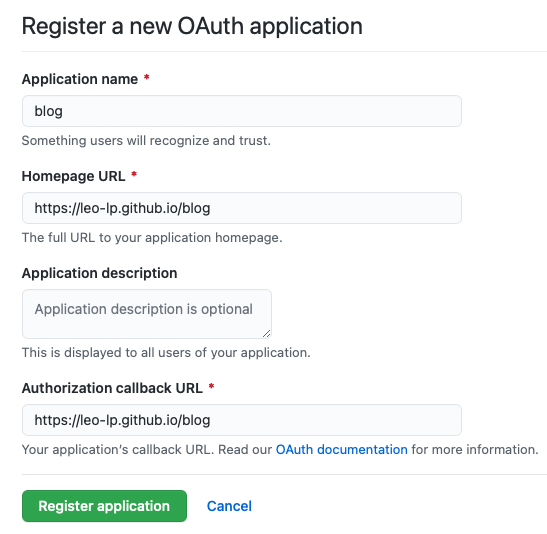
获取 Client ID 和 Secret
现在你已经创建了一个新的 OAuth App,并得到了相应的 Client ID 和 Client Secret。如下图:

安装 Vssue
通过 NPM 安装 @vssue/vuepress-plugin-vssue 和你需要使用的 API 包 :
1
2
npm install @vssue/vuepress-plugin-vssue
npm install @vssue/api-github-v3
配置 Vssue
在 config.js 中填写如下配置。具体插件使用方法可参考 VuePress 官方文档
1
2
3
4
5
6
7
8
9
10
11
12
13
// .vuepress/config.js
module.exports = {
  plugins: {
    '@vssue/vuepress-plugin-vssue': {
      platform: 'github', // 设置 `platform` 而不是 `api`
      locale: 'zh', // 本地化。如果你不设置 locale,Vssue 会自动使用 VuePress 的 $lang 作为当前页面的语言
      owner: 'OWNER_OF_REPO', // 对应 repository 的拥有者帐号或者团队
      repo: 'NAME_OF_REPO', // 用来存储评论的 repository
      clientId: 'YOUR_CLIENT_ID', // OAuth App 的 client id
      clientSecret: 'YOUR_CLIENT_SECRET', // OAuth App 的 client secret
    },
  },
};
使用 Vssue 组件
你可以在你的 Markdown 文件中直接使用它。
1
2
3
4
5
<!-- README.md -->

# 你自己写的 Markdown 文件 的内容

<Vssue :title="$title" />
对于上述的配置,如果你运行起服务: yarn docs:dev 。应该看到以下页面: 
Github 部署
下述的指南基于以下条件:
- 文档放置在项目的
docs目录中; - 使用的是默认的构建输出位置;
- VuePress 以本地依赖的形式被安装到你的项目中,并且在
package.json中配置了如下代码:
1
2
3
4
5
{
  "scripts": {
    "docs:build": "vuepress build docs"
  }
}
- 文档放置在项目的
创建 Github 仓库
在 github 上创建一个名为
blog的仓库,并在config.js中配置base值为blog1 2 3 4
// .vuepress/config.js module.exports = { base: '/blog/', }
在你的项目根目录中,创建一个如下的
deploy.sh文件:1 2 3 4 5 6 7 8 9 10 11 12 13 14 15 16 17 18 19 20 21 22
#!/usr/bin/env sh # 确保脚本抛出遇到的错误 set -e # 生成静态文件 yarn docs:build # 进入生成的文件夹 cd docs/.vuepress/dist # 如果是发布到自定义域名 # echo 'www.example.com' > CNAME git init git add -A git commit -m 'deploy' # 如果发布到 https://<USERNAME>.github.io/<REPO> git push -f git@github.com:<USERNAME>/<REPO>.git main:gh-pages cd -
执行部署脚本
deploy.sh1
./deploy.sh- 上述脚本
deploy.sh会在 GitHub 的blog仓库中创建一个名为gh-pages的分支,并将生成的静态文件提交到该分支下。
- 上述脚本
设置 GitHub Pages
在 blog 仓库下点击 Setting 按钮,找到 GitHub Pages - Source,然后选择 gh-pages 分支,点击 Save 按钮即可。👇👇👇下面是配置后的效果图:
